This Spider Cookies Recipe is a fun and chewy recipe, which is made with creamy peanut butter and miniature peanut butter cups. It’s the perfect Halloween treat, ready in about an hour.
Jump to RecipeSpider Cookies Recipe Ingredients
- 1 cup creamy peanut butter
- 1/2 cup vegetable shortening
- 1/4 cup butter, softened
- 1/2 cup granulated sugar
- 1/2 cup packed light brown sugar
- 1 large egg
- 1 tsp. vanilla extract
- 2 cups all-purpose flour
- 1 tsp. baking soda
- 1/2 tsp. salt
- 20 miniature peanut butter cups, such as Reese’s Minis
- 20 chocolate-covered peanuts or raisins
- Black or brown writing gel icing

How To Make Spider Cookies Recipe
- Prep the Oven: Preheat your oven to 350˚F. Line two baking sheets with parchment paper.
- Cream the Fats and Sugars: In a large bowl with an electric mixer, beat together the peanut butter, shortening, butter, granulated sugar, and brown sugar on medium-high speed until the mixture is light and fluffy, about 4 to 5 minutes.
- Add Wet Ingredients: Add the egg and vanilla to the bowl and beat until just combined.
- Combine Dry Ingredients: In a separate medium bowl, whisk together the flour, baking soda, and salt.
- Make the Cookie Dough: With the mixer on low speed, gradually add the flour mixture to the peanut butter mixture and beat until a cohesive dough forms.
- Shape and Bake: Scoop the dough into 20 even portions (about 2 packed tablespoons each) and roll them into smooth balls. Arrange the balls 2 inches apart on the prepared baking sheets and flatten each one slightly. Using your thumb, gently press an indentation into the center of each cookie. Bake for 8 to 10 minutes, rotating the sheets halfway through, until the edges are lightly golden.
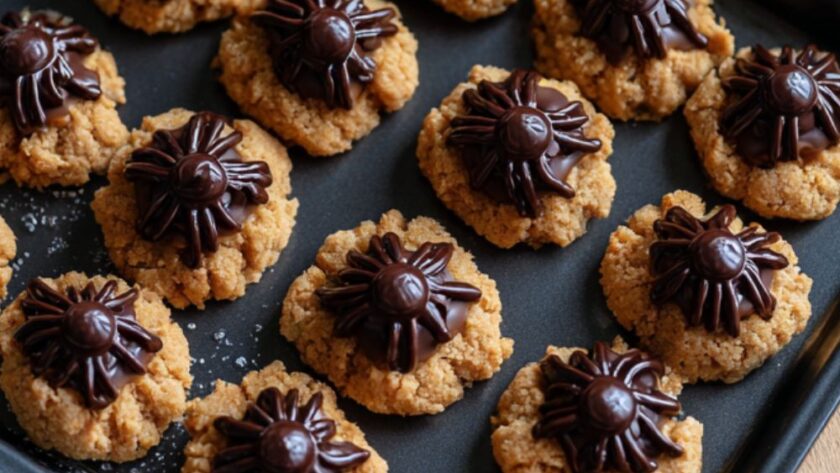
- Create the Spider Bodies: As soon as you remove the cookies from the oven, while they are still hot, gently press one miniature peanut butter cup into the thumbprint of each cookie to form the spider’s “body.” Immediately after, gently press one chocolate-covered peanut or raisin just above the peanut butter cup to create the “head.”
- Cool the Cookies: Allow the cookies to cool on the baking sheets for 5 minutes to set, then transfer them to a wire rack to cool completely.
- Draw the Legs: Once the cookies are completely cool, use the black or brown gel writing icing to carefully draw eight small legs on each spider, starting from the sides of the peanut butter cup body. Let the icing set before serving.

Recipe Tips
- How to keep the cookies from spreading? For thicker, chewier cookies that spread less, chill the rolled dough balls on the baking sheet for 20-30 minutes before baking.
- What if I can’t find miniature peanut butter cups? You can use other small, round chocolates. Chocolate Kisses (placed upside down), Rolos, or even large chocolate chips can work as a substitute for the spider’s body.
- How do I make a perfect thumbprint? Make the indentation before baking. If the indentation puffs up during baking, you can gently re-press it with the back of a small round measuring spoon as soon as the cookies come out of the oven, just before adding the peanut butter cup.
- Can I make the dough ahead of time? Yes, the cookie dough can be made and refrigerated for up to 3 days. Let it soften slightly at room temperature before scooping and rolling.
What To Serve With Spider Cookies
These are the perfect standalone treat for a Halloween party, but they are great served:
- On a platter with other spooky treats like ghost meringues or monster rice krispie treats.
- With a tall glass of cold milk.
- As a fun dessert after a festive meal of chili or pumpkin soup.

How To Store Spider Cookies
Room Temperature: Store the finished cookies in a single layer in an airtight container at room temperature for up to 5 days. Stacking them may smudge the icing legs. Freeze: You can freeze the baked, undecorated cookies for up to 3 months. Thaw at room temperature before adding the spider legs with icing. You can also freeze the raw dough balls for up to 3 months.
Spider Cookies Nutrition Facts
- Serving: 1 cookie
- Calories: 260kcal
- Protein: 5g
- Fat: 16g
- Carbohydrates: 25g
- Sugar: 15g
- Sodium: 150mg
Nutrition information is estimated and may vary based on ingredients and cooking methods used.
FAQs
The combination of shortening and butter gives these cookies a soft, chewy texture that doesn’t spread too much. You can use all butter, but the cookies will be flatter and crispier.
Some gel icings stay soft. For legs that harden, it’s better to use a tube of black cookie icing or royal icing, which will dry firm. In a pinch, you can also melt chocolate chips and pipe the legs on with a small piping bag.
Yes, you can substitute crunchy peanut butter for a different texture. The cookies will have little crunchy bits throughout, but the base recipe remains the same.
Try More Recipes:

Spider Cookies Recipe
Course: DessertCuisine: AmericanDifficulty: Easy20
servings25
minutes10
minutes260
kcalA fun and chewy peanut butter cookie topped with a chocolate peanut butter cup to create a cute and spooky spider, perfect for Halloween parties.
Ingredients
-
1 cup creamy peanut butter
-
1/2 cup vegetable shortening
-
1/4 cup butter, softened
-
1 cup total sugars (1/2 cup granulated, 1/2 cup brown)
-
1 large egg
-
1 tsp vanilla extract
-
2 cups all-purpose flour
-
1 tsp baking soda
-
1/2 tsp salt
-
20 miniature peanut butter cups
-
20 chocolate-covered peanuts
-
Black gel writing icing
Directions
- Preheat oven to 350°F. Line two baking sheets with parchment paper.
- Cream peanut butter, shortening, butter, and sugars until fluffy. Beat in egg and vanilla.
- In a separate bowl, whisk together flour, baking soda, and salt.
- On low speed, mix the dry ingredients into the wet ingredients until just combined.
- Roll dough into 20 balls, flatten slightly, and make a thumbprint in the center of each.
- Bake for 8-10 minutes. Immediately press a peanut butter cup (body) and a chocolate peanut (head) into each warm cookie.
- Cool completely on a wire rack before drawing on eight spider legs with gel icing.
Notes
- Press the peanut butter cups into the cookies while they are still hot from the oven; this helps the chocolate melt slightly and adhere properly.
- For cleaner lines that set hard, use black cookie icing or royal icing instead of writing gel.
- Chilling the dough for 30 minutes before baking will result in thicker cookies that spread less.
- Don’t overbake the cookies; they should be just set and slightly golden on the edges for the best chewy texture.